
You published a post two weeks ago. You have searched Google for it more times than you want to admit, and it is still not there. Nothing is broken, no error message appeared, and yet your work is simply invisible.
This is one of the most frustrating parts of running a new blog, and it is also one of the most misunderstood. Most of the advice you will find says “just submit it to Search Console” and stops there, which explains why so many people submit a URL, wait, and still see nothing.
Getting indexed faster is really about removing every obstacle between your new post and Google’s crawler, then giving it a nudge. In this guide we will work through all of it in order, from checking whether your post is actually indexed to fixing the settings that quietly block indexing entirely.
1. Check Whether Your Post Is Actually Indexed
Before fixing anything, find out what you are actually dealing with. Searching Google for your post title tells you almost nothing, because a page can be fully indexed and still sit on page eight where you will never scroll.
There are two reliable checks, and both take under a minute.
The quick check: the site operator
Go to Google and search for your exact page address with the site operator in front of it, like this:
site:yourdomain.com/your-post-slug/If your post appears, it is indexed. If Google returns nothing, it is not. That is the whole test, and it works without logging into anything.
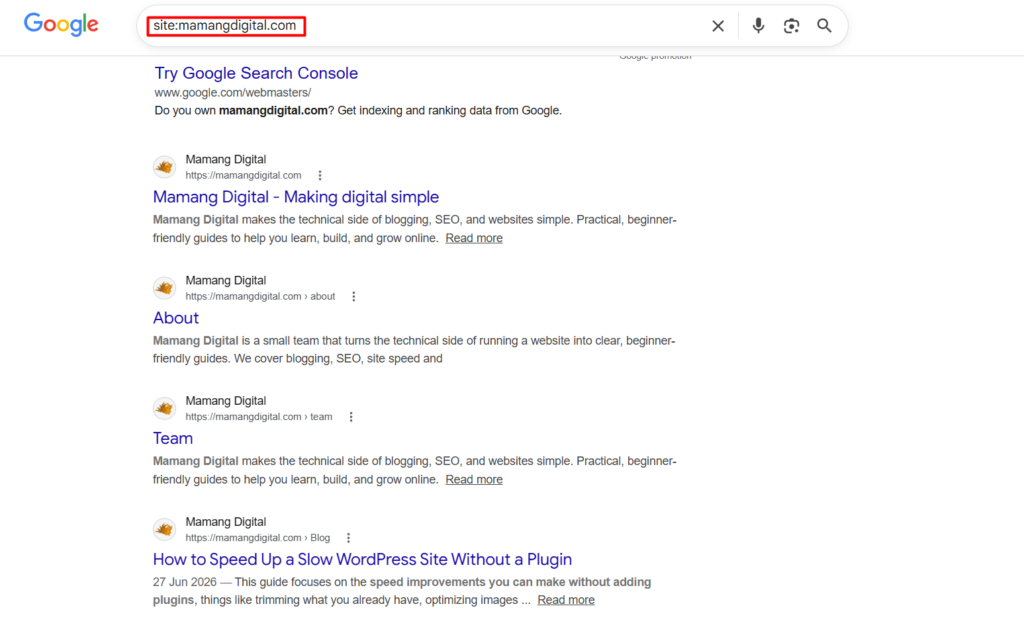
You can also drop the slug and just use site:yourdomain.com to see roughly how many of your pages Google has stored, which is useful for spotting whether the problem is one post or your whole site.
The proper check: URL Inspection
For the real answer, open Google Search Console and paste your post address into the wide search bar at the very top of the screen. That bar is the URL Inspection tool.
Google will tell you plainly either ‘URL is on Google’ or ‘URL is not on Google’, and if there is a problem it usually tells you what it is. This is far more useful than guessing from search results.
If you have not connected your site to Search Console yet, do that first, because almost everything below depends on it. Our guide on adding your website to Google Search Console walks through it.
2. Rule Out the Settings That Block Indexing
Here is the part most guides skip, and it is the reason many people submit URL after URL with no result. If something on your site is telling Google to stay away, no amount of submitting will help.
Check these three things before you do anything else. Each takes seconds.
The WordPress checkbox that hides your whole site
This one catches more new bloggers than anything else on this list. In your dashboard, go to Settings » Reading and look for the box labeled ‘Discourage search engines from indexing this site’.
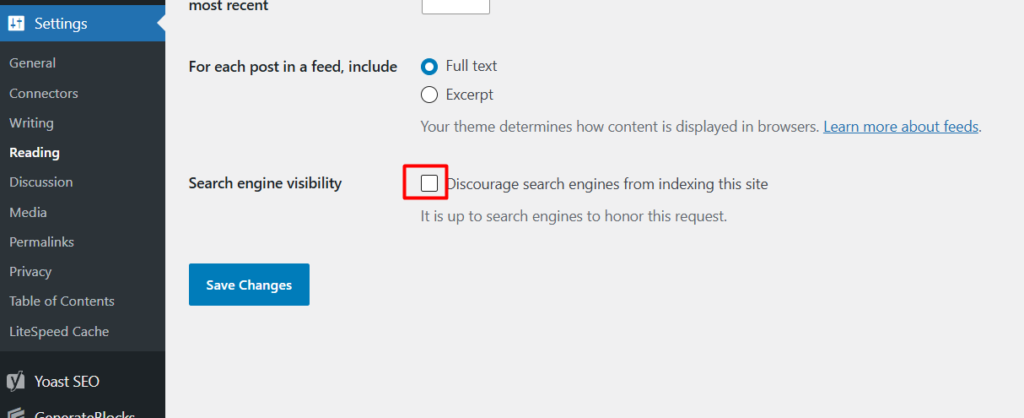
If that box is ticked, uncheck it and save. Nothing else in this guide will work while it is on.
It gets ticked more often than you would expect, usually because it was switched on deliberately while the site was being built and then forgotten once the site went live. If you built your site over several weeks before launching, check this now.
A noindex tag on the individual post
Your SEO plugin can also hide one specific post while leaving the rest of your site fine. In Yoast SEO, open the post, scroll to the Yoast panel, open the Advanced tab, and check that ‘Allow search engines to show this Post in search results?’ is set to Yes.
Rank Math has the same setting under its Advanced tab, where the Robots Meta options should not have ‘No Index’ selected.
This is worth checking on any post that refuses to index while your other posts index fine, since a site-wide problem would affect everything equally.
A block in your robots.txt file
Open a new tab and go to yourdomain.com/robots.txt. You will see a short text file.
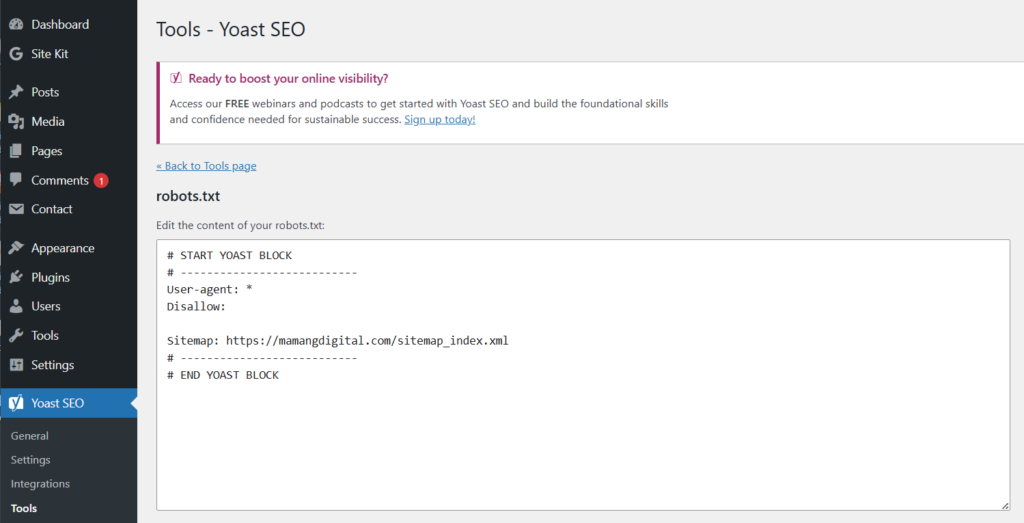
What you are looking for is a line reading Disallow: / with nothing after the slash, which tells crawlers to stay out of your entire site. An empty Disallow: line is healthy and means nothing is blocked.
Most beginners never need to touch this file at all, and the safest advice is to leave it alone unless you find an actual problem. Our guide on robots.txt explained covers what the lines mean and how not to break your site with it.
3. Submit the URL Directly to Google
With the blockers ruled out, now the direct approach actually works. This tells Google your page exists instead of waiting for it to be discovered.
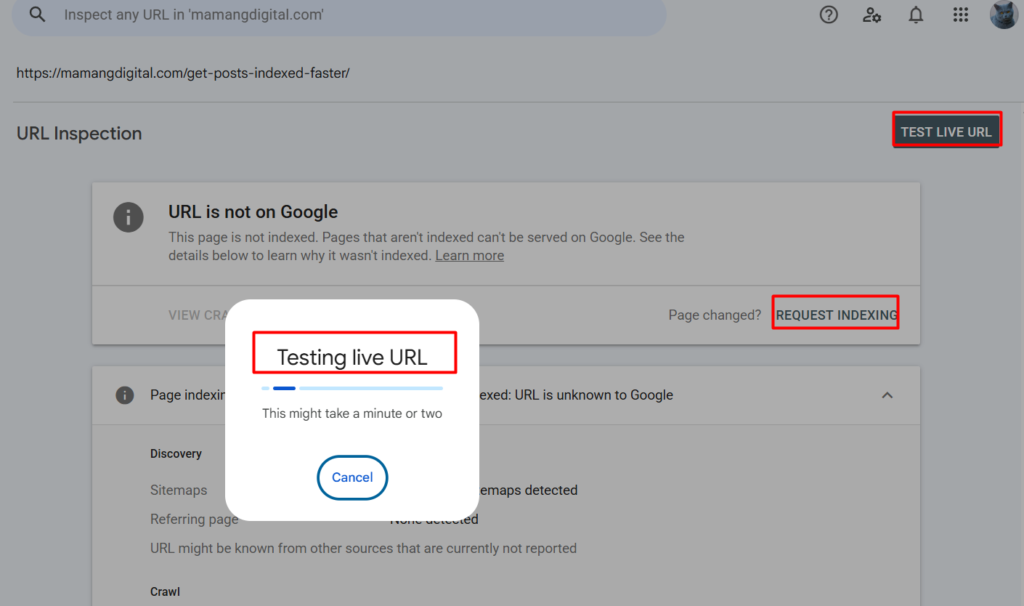
Step 1: Paste your URL into the inspection bar
In Search Console, make sure the correct site is selected in the dropdown at the top left, then paste your full post address into the search bar at the top and press Enter. Include the https part.
Google will report what it currently knows. For a fresh post, expect ‘URL is not on Google’.
Step 2: Run Test Live URL first
Click Test Live URL in the top right corner before requesting anything. This checks your page as it exists right now, rather than showing you old information.
Do not skip this. If Google cannot reach or read the page, the live test says so immediately, and you save yourself a week of wondering why nothing happened.
Step 3: Click Request Indexing
Once the live test comes back clean, click Request Indexing. Google runs a quick check and confirms your URL has been added to a priority crawl queue.
If the button is grayed out or missing, Google has already detected a hard problem such as a broken page or a noindex tag, and it will not queue something it knows it cannot index. Go back to section two.
Two limits worth knowing
Submitting again does not speed anything up. Google says this plainly in its own documentation: requesting a recrawl multiple times for the same URL will not get it crawled any faster. Submit once and leave it.
There is a daily quota. Search Console limits individual submissions to roughly ten per day per property. Google does not publish the exact number and it varies, but if you see a ‘Quota exceeded’ message, that is what happened. Come back tomorrow.
Because of that quota, this tool is for individual important posts, not for pushing your whole site through. That job belongs to your sitemap.
4. Make Sure Your Sitemap Is Doing Its Job
Your sitemap is the quiet workhorse here. Once it is set up correctly, every post you publish gets added automatically, and Google finds new content without you lifting a finger.
Most people have one without realizing it, because Yoast SEO and Rank Math both generate one for you automatically the moment they are activated.
Find your sitemap
Open yourdomain.com/sitemap_index.xml in your browser. If you use Yoast, that is almost certainly your address. Rank Math typically uses yourdomain.com/sitemap_index.xml as well.
You should see a plain list of links to smaller sitemaps, one for posts, one for pages, and so on. It looks unstyled and slightly ugly, which is normal, because it was written for machines rather than people.
Confirm your new post is in it
Click into the posts sitemap and look for your new post. If it is listed, your sitemap is working and Google will find the post on its own eventually.
If it is missing, the usual cause is caching serving you an old version of the file. Clear your cache and reload before assuming something is broken.
Submit it to Search Console once
In Search Console, open Sitemaps in the left sidebar, type sitemap_index.xml into the field, and click Submit. You should see ‘Success’ appear in the status column.
You only ever need to do this once. After that it updates itself, and there is no benefit to resubmitting it every time you publish. Our guide on creating and submitting an XML sitemap covers the details if yours is missing entirely.
5. Add Internal Links to Your New Post
This step gets ignored constantly, and it is one of the most effective things you can do. A brand new post with no links pointing to it is an island, and islands are hard to find.
Google discovers pages largely by following links. When several of your existing indexed pages point to your new one, you have given the crawler multiple routes to reach it instead of relying on a single submission.
How to do it in five minutes
Search your own site for the topic of your new post. Use site:yourdomain.com your topic in Google, or just use your own site’s search box.
Pick two to five older posts that are already indexed and genuinely relate to the new one. Open each, find a sentence where mentioning the new post actually helps the reader, and add a link there.
Use descriptive link text rather than ‘click here’, so both readers and Google understand what they are about to open.
One honest caution: only add links where they make sense. Stuffing links into unrelated posts to speed up indexing makes your writing worse and helps nobody. If a link does not serve the reader, do not add it.
6. When Google Crawled It but Did Not Index It
Sometimes URL Inspection tells you something more specific and more frustrating: ‘Crawled – currently not indexed’. This means Google visited your page, looked at it, and decided not to store it.
This is not a technical error, and no amount of resubmitting will change it. It is a judgment about the page itself, which is harder to hear but more useful to know.
The usual causes are worth being honest about. The page may be thin, meaning it does not say enough to be worth storing. It may duplicate something else on your site or elsewhere. Or your site may simply be new enough that Google is being selective while it builds a picture of you.
What actually helps is improving the page rather than resubmitting it. Add the detail that is genuinely missing, make sure it answers the question completely, and link to it from your stronger existing pages. Then wait, and check again in a week or two.
If this status appears across many of your pages rather than one, that is a signal about your site as a whole rather than any single post, and the answer is the slower one: keep publishing genuinely useful content until Google has enough reason to trust the site.
7. Build the Habit That Makes This Automatic
Everything above becomes much less stressful once it turns into a small routine you run on publish day. Here is the routine worth building.
When you publish, add two or three internal links from older posts straight away, while the topic is fresh in your mind. Then submit the URL once in Search Console and close the tab.
Come back after roughly a week and inspect the URL again to see whether it is indexed. Not before, because checking daily changes nothing and only makes the wait feel longer.
That is the entire routine, and it takes about five minutes per post. Everything else, the sitemap and your indexing settings, is set up once and then left alone.
One last thing worth saying plainly, because it saves a lot of disappointment. Getting indexed is not the same as getting traffic. Your post can be fully indexed and still receive no visitors for months, because indexing simply means Google stored it, while ranking is a separate and much slower competition. Our guide on indexing versus ranking explains why that gap exists and why it is normal.
Frequently Asked Questions
How long does Google take to index a new post?
Commonly a few days to a couple of weeks, and it varies a lot by site. Established sites that publish regularly tend to get indexed within days, while brand new sites often wait longer because Google has not yet learned how often to check them.
Why is my post not showing up even after requesting indexing?
The most common reasons are the ‘Discourage search engines from indexing this site’ box being ticked under Settings » Reading, a noindex setting on the individual post, or simply not enough time having passed. Run Test Live URL in Search Console, since it usually names the problem directly.
How many URLs can I submit to Google per day?
Roughly ten per property per day through the URL Inspection tool, though Google does not publish an exact figure and it varies by account. Exceeding it produces a ‘Quota exceeded’ message. For larger batches, rely on your sitemap instead.
Does resubmitting the same URL make it index faster?
No. Google’s own documentation states that requesting a recrawl multiple times for the same URL will not get it crawled any faster. Submit once, then use your quota on other pages instead.
What does ‘Crawled – currently not indexed’ mean?
Google visited your page but decided not to store it. This usually points to thin or duplicate content, or to a site that is still too new for Google to index everything. Improving the page and linking to it internally helps far more than resubmitting.
Do I need to submit my sitemap every time I publish?
No. Submit it once in Search Console and it keeps working. Yoast and Rank Math update your sitemap automatically whenever you publish, so resubmitting achieves nothing.