
You have heard you need a sitemap. Maybe Search Console asked for one, or a guide told you to submit it, and now you are staring at the word wondering what it even is and where to find yours.
Here is the good news before we start. For most people, you do not actually have to build a sitemap from scratch. Your site very likely already made one for you, and the real job is just finding it, checking it works, and handing it to Google the right way.
This guide covers all of it, from understanding what a sitemap really does, to locating yours on WordPress or Blogger, to checking it is valid before you submit, to fixing the errors that trip people up afterward. We will go further than a quick “here is the button” walkthrough, because the small details are exactly where beginners get stuck.
What an XML Sitemap Actually Is
A sitemap is a simple file that lists the pages on your site you want search engines to find. Think of it as a guest list you hand to Google. Instead of letting it wander your site hoping to stumble onto everything, you give it a clean list and say, here is what matters, please look at these.
The “XML” part just describes the format. XML is a way of organizing information so machines can read it easily. If you ever open your sitemap, it looks like a wall of tags and links rather than a normal web page. That is fine. It was written for Google to read, not for you.
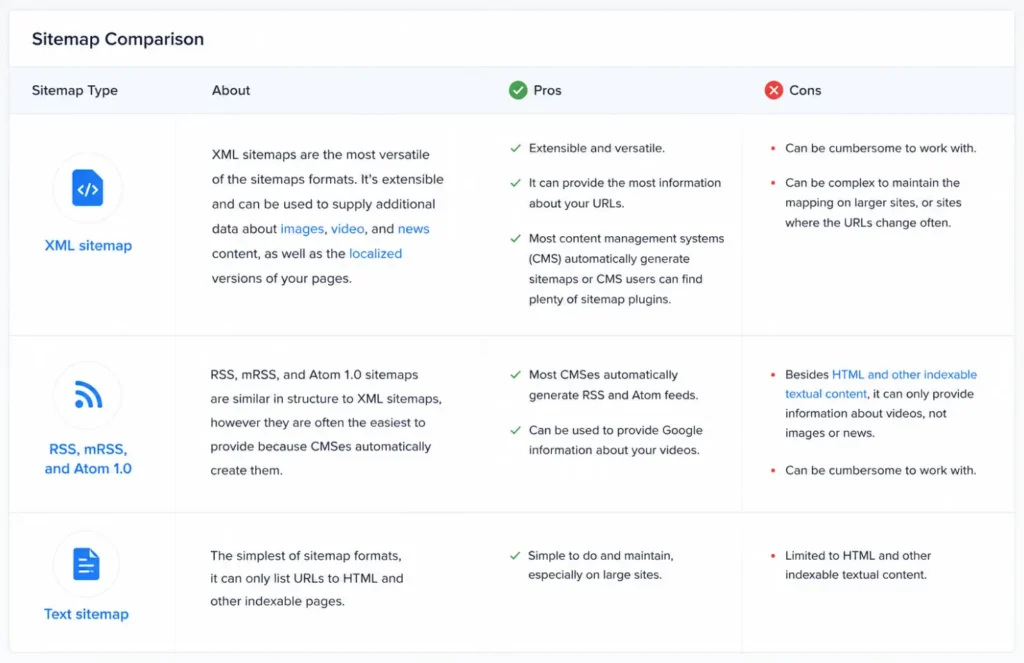
It helps to know there is a second kind too, because guides mix them up and confuse people. An XML sitemap is for search engines. An HTML sitemap is a normal page that lists your content for human visitors to click through. They sound similar but serve different audiences. For getting found on Google, the XML sitemap is the one that matters, and it is what this guide focuses on.
Do You Even Need to Create One?
This is the question almost every guide skips, and it saves you the most time. For a lot of sites, the answer is no, you do not need to create anything, because one already exists.
Most modern platforms generate a sitemap for you automatically and keep it updated every time you publish. WordPress, Blogger, Shopify, Wix, and Squarespace all do this out of the box. So before you go looking for a tool or plugin to build one, your first move is simply to find the one you already have.
Google itself says sitemaps help most when your site is large, brand new, has pages that are not well linked together, or contains a lot of media. A tiny five page site that links to itself well may get crawled fine without one. But here is the honest take: a sitemap almost never hurts, it takes minutes to submit, and on a new site it is one of the most reliable ways to get noticed faster. So even if you might technically be fine without it, submitting one is worth the small effort.
Finding Your Sitemap on WordPress
WordPress is the most common case, so let us be precise here, because the exact address depends on what you have installed. There are three likely locations, and you find yours by trying them in your browser.
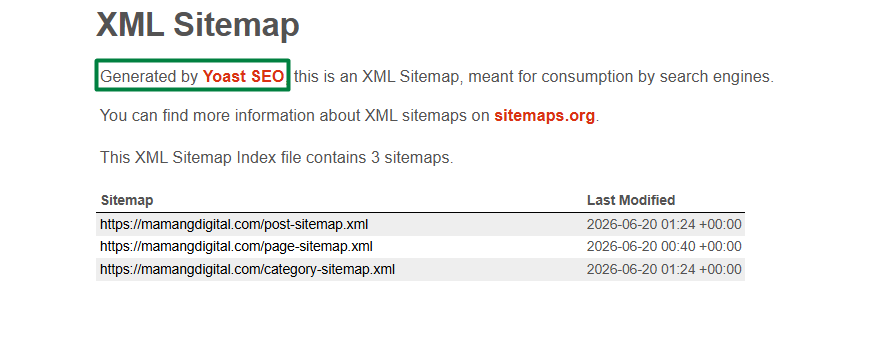
If you use an SEO plugin like Yoast or Rank Math, which most WordPress sites do, your sitemap almost always lives at yourdomain.com/sitemap_index.xml. Try that first. This is an index file, meaning it is a master list that points to smaller sitemaps for your posts, pages, categories, and so on.
If you have no SEO plugin and you are on WordPress 5.5 or newer, WordPress builds a basic one itself at yourdomain.com/wp-sitemap.xml. It is simpler than a plugin version, but it works.
Type whichever applies into your browser and hit enter. If you see a structured list of links, you found it. Copy that full address, because that is what you will hand to Google in a minute. One small but real warning: if you have more than one SEO plugin active, they can fight over the sitemap and break it. Keep only one SEO plugin running.
If you genuinely have no sitemap, the fix is not to write XML by hand. Just install one SEO plugin like Yoast or Rank Math, and it generates and maintains the sitemap for you from that point on. That is the easiest route by far, and it brings other SEO benefits too.
Finding Your Sitemap on Blogger
Blogger gets glossed over in most guides, even though plenty of beginners start there. The good news is Blogger handles this for you, and you do not install anything.

Your Blogger sitemap sits at yourdomain.com/sitemap.xml. Open that address in your browser to confirm it loads and shows your posts. Blogger generates and updates this file for you automatically, so there is nothing to install or build.
One quirk worth knowing. Blogger’s default sitemap covers your posts but not your static pages, like an About or Contact page. If getting those indexed matters to you, Blogger also generates a separate feed for pages. For most blogs the standard sitemap.xml is all you need, so do not overthink it unless you have important static pages sitting outside it.
Check Your Sitemap Is Valid Before You Submit It
Almost every guide rushes you straight to the submit button. We are going to pause here, because this single step prevents the most common error people hit later. Submitting a broken sitemap and then troubleshooting it in Search Console is far more painful than checking it now.
Start with the simplest check. Open your sitemap address in a browser. You want to see a list of URLs or links to smaller sitemaps. If instead you get a 404 “not found” page, a blank screen, or an error, then the address is wrong or the sitemap is not being generated. Fix that before going anywhere near Google, because Google will only see the same problem.
Next, glance at what is actually listed. Your sitemap should contain the real pages you want found, your posts, your key pages. It should not be stuffed with junk like tag archives, attachment pages, or thin pages you would not want showing up in search. A clean sitemap that lists only your good content helps Google spend its attention where it counts. Most SEO plugins let you exclude the clutter in their sitemap settings.
If you want to be thorough, you can paste your sitemap address into a free XML sitemap validator online. It checks the file is properly formatted and flags broken entries. This is optional for a standard plugin sitemap, which is almost always valid, but it is reassuring if something feels off.
Submitting Your Sitemap to Google Search Console
Now the main event. Sitemaps are submitted through Google Search Console, the free tool Google gives every site owner. If you have not set it up yet, that is the real first step, and we cover the entire process in our guide on how to add your website to Google Search Console. You need a verified site there before any of this works, so start there if you are not set up.
Once your site is verified, here is the exact path. Log in to Search Console and select your site from the property dropdown in the top left. In the left sidebar, find the Indexing section and click Sitemaps. This opens the Sitemaps report.
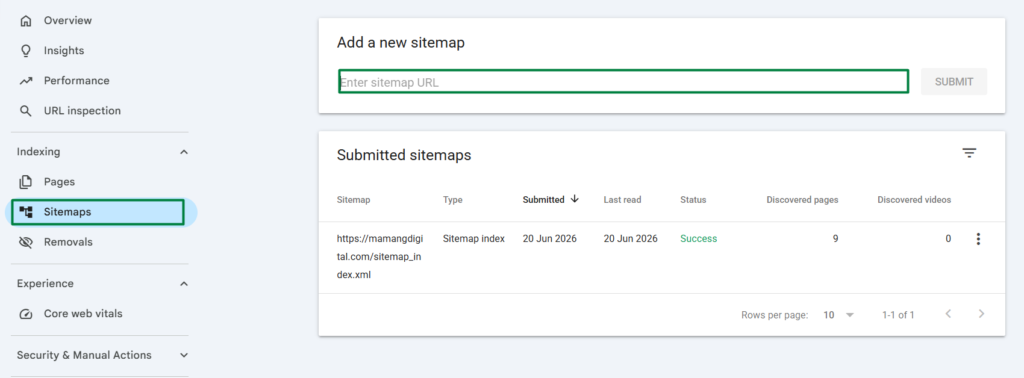
You will see a field labeled “Add a new sitemap”. Here is the part that confuses people: you do not paste your whole long address. The field already shows your domain, so you only type the part that comes after it. For a Yoast or Rank Math site, you type sitemap_index.xml. For default WordPress, wp-sitemap.xml. For Blogger, sitemap.xml. Then click Submit.
That is it. And here is a detail that saves real confusion: you only submit the index sitemap, the master file. You do not need to submit each smaller sitemap for posts, pages, and categories one by one. Google reads the index and automatically discovers all the sub-sitemaps inside it. Submitting them individually is unnecessary work that beginners often do out of worry.
What the Status Messages Actually Mean
After you submit, Search Console shows a status, and the wording panics people who do not know what is normal. Let us translate the ones you will actually see.
Success means Google read your sitemap fine. You are done. The “discovered URLs” number next to it is how many links Google found in the file, not how many it has indexed yet, so do not confuse the two.
Couldn’t fetch is the one that worries everyone, and most of the time it is harmless. Very often it simply means Google has not gotten around to reading your sitemap yet, not that anything is broken. The single most common mistake here is panicking and resubmitting over and over within minutes. Submit once, then give it a day before assuming something is wrong.
Has errors or Couldn’t read means Google reached the file but something inside it is off. This is the case that actually needs your attention, and the next section is for you.
Fixing a “Couldn’t Fetch” That Does Not Clear
If a day or two passes and the error sticks, work through these in order. They are listed from most common to least, so stop the moment one solves it.
First, open the sitemap in your browser again and confirm it actually loads. If it shows a 404 or blank page, the problem is the address, not Google. Double check you used the exact path with no typos, and that you typed https and not http if your site uses secure pages.
Second, check your robots.txt file is not blocking it. Visit yourdomain.com/robots.txt and make sure there is no line stopping access to your sitemap. A healthy robots.txt usually even lists your sitemap address. If you are unsure what a blocked file looks like, this is the same robots.txt issue that can keep a whole site hidden, which we explain in our guide on why your website is not showing up on Google.
Third, make sure you submitted the right address. A surprising number of “errors” come from submitting the full URL when only the path was needed, or adding an extra slash. Delete the bad entry in the Sitemaps report and resubmit the clean version.
If all of that checks out and it still fails after several days, it is usually a temporary issue on Google’s side or your host’s. Give it time. As frustrating as it sounds, patience resolves more sitemap errors than any fix, because a real broken sitemap is rare once the address is correct.
After You Submit: What Happens Next
Submitting your sitemap is not the finish line, it is the starting gun. Knowing what to expect afterward keeps you from worrying when nothing seems to happen right away.
Google does not index everything instantly. It reads your sitemap, adds your pages to its queue, and works through them over days or weeks. A new site especially takes time to build up in the index, so an empty looking report in the first week is completely normal, not a sign you did something wrong.
You also do not need to resubmit your sitemap every time you publish a new post. With WordPress and Blogger, the sitemap updates itself automatically, and Google rechecks it on its own schedule. Submit it once, and leave it. The only time to touch it again is if you switch platforms or SEO plugins and your sitemap address actually changes.
When you do publish something important and want it seen quickly, there is a faster nudge than waiting for the sitemap, the URL Inspection tool, which lets you request indexing for a single page. We walk through that inside the Search Console guide, and it pairs nicely with having your sitemap submitted.
Submitting your sitemap is a small, one time task, and once it is done you can stop thinking about it. Get it submitted, confirm it reads as Success, and then put your energy where it actually moves the needle, writing content worth finding.
Frequently Asked Questions
Where is my sitemap if I use WordPress?
If you have an SEO plugin like Yoast or Rank Math, try yourdomain.com/sitemap_index.xml first. If you have no SEO plugin and run WordPress 5.5 or newer, it sits at yourdomain.com/wp-sitemap.xml. Open the address in your browser to confirm it loads.
Do I need to submit every sub-sitemap separately?
No. You only submit the main index sitemap. Google reads it and automatically finds all the smaller sitemaps for your posts, pages, and categories inside it. Submitting each one separately is unnecessary.
My sitemap says “Couldn’t fetch.” Did I do something wrong?
Usually not. Most of the time it just means Google has not read the file yet, and it clears on its own within a day or two. First confirm the sitemap opens in your browser. If it loads fine, wait before troubleshooting, and do not resubmit repeatedly.
How often should I update or resubmit my sitemap?
On WordPress and Blogger you do not need to. The sitemap updates automatically when you publish, and Google rechecks it on its own. You only resubmit if you change platforms or plugins and the sitemap address itself changes.
Does submitting a sitemap improve my rankings?
Not directly. A sitemap helps Google discover and crawl your pages faster, which is about being found, not about ranking higher. Rankings still come from good content and SEO. A sitemap simply makes sure Google knows your pages exist so they have the chance to rank.