Search for a Blogger SEO tutorial and about half of them will tell you to open Settings » Search Preferences. Go and look for that menu. It isn’t there. Blogger removed it in the 2020 redesign and folded everything into one long Settings page, and guides published in 2025 still haven’t noticed.
So this guide covers what’s actually in your dashboard right now, in the order you’d sensibly do it. It also covers two settings that nearly every tutorial tells you to switch on when you shouldn’t.
One thing to be upfront about: Blogger has no plugins. There’s no Yoast, no Rank Math, no All in One SEO. What’s in Settings is what you get. The good news is that it’s a short list and you only have to do most of it once.
I’m assuming you already have a blog with a few posts on it. Everything below works the same whether you’re on a .blogspot.com address or a custom domain.
Turning On the Search Description
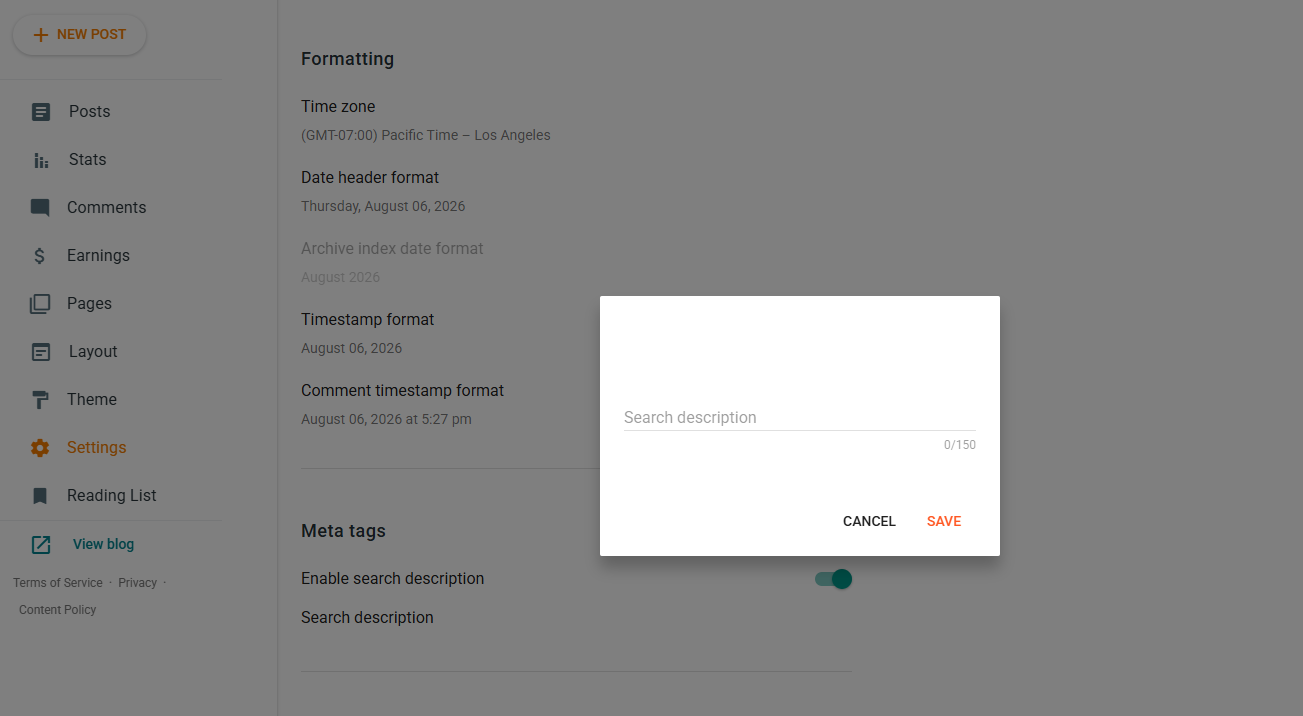
Open Settings » Meta tags » Enable search description and slide it on.
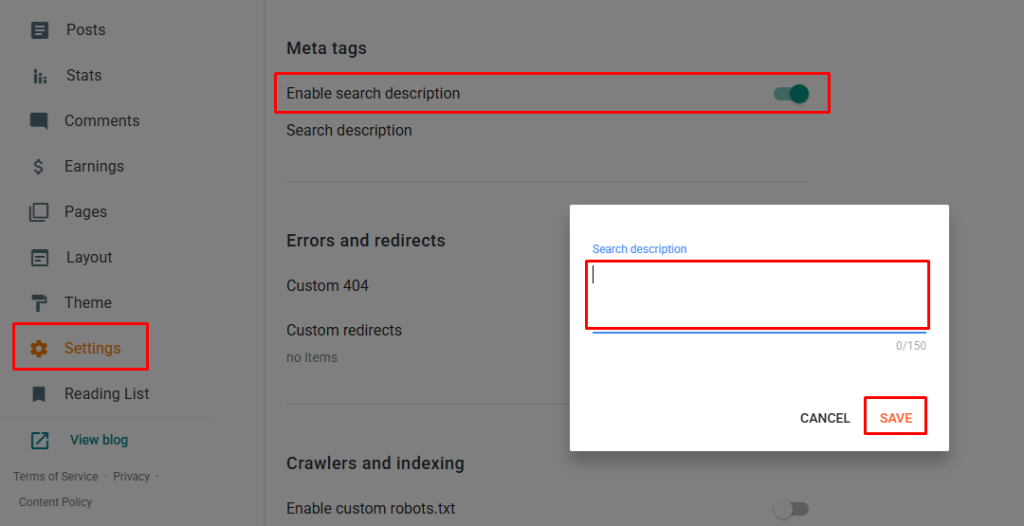
Blogger ships this OFF. Until you flip it, every post you publish goes out with no meta description at all, and Google writes its own snippet from whatever it scrapes off your page.
A text box appears once it’s on. That one is for your homepage. The limit is 150 characters and Blogger enforces it, so don’t bother drafting 200 and hoping.
Here’s the part people miss. Turning this on is what makes the Search Description box appear in the post editor. Leave it off and that box never shows up, which is why some people swear their Blogger doesn’t have the feature.
Writing a Description for Every Post
Open any post, look at the right sidebar, click Search Description. Same 150-character ceiling.
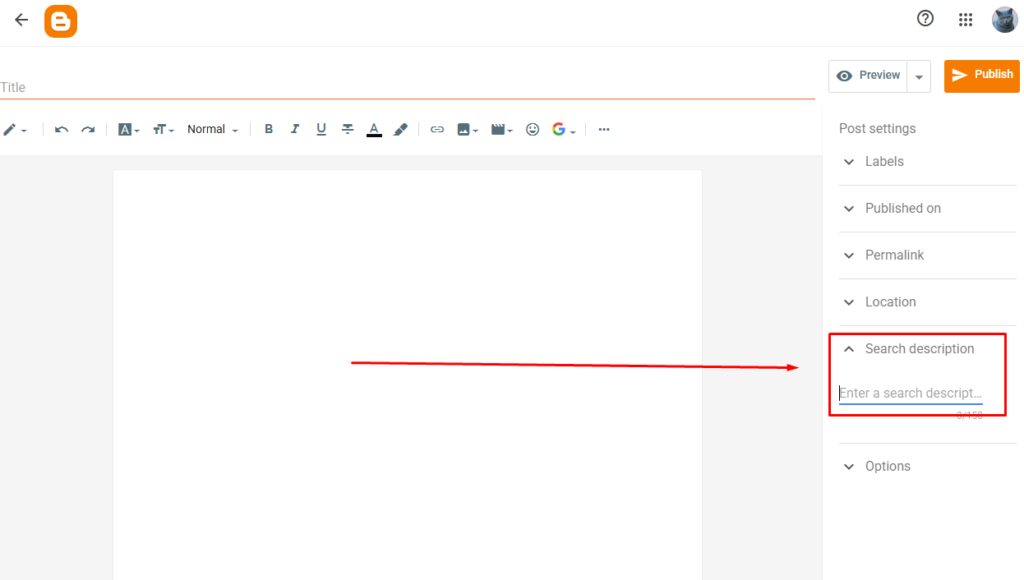
Write it for the person scanning search results, not for the crawler. Tell them what they’ll get. “Every Blogger SEO setting that still exists, plus two you should leave alone” works. “blogger seo, seo blogger, cara seo blogger” does not.
Be aware that Google will sometimes ignore what you wrote and generate its own snippet anyway. That’s normal and it isn’t a penalty. Google does it when it thinks a different chunk of your page answers the searcher better. You still fill the box in, because leaving it empty means you never get a say at all.
Setting a Custom Permalink
In the post editor sidebar: Permalink » Custom Permalink.
Blogger’s automatic permalink slices your title into a slug and it isn’t always smart about it. Long titles get chopped mid-word, and posts with the same opening words end up with numbers bolted onto the end.
Now the part no tutorial says out loud. Blogger will NOT let you change the date folders or the file extension. Your URL is locked into this shape:
yourblog.com/2026/08/your-custom-slug.htmlOnly the middle bit is yours. The year, the month and the .html stay. If a guide promises you a clean WordPress-style URL on Blogger, it’s selling you something that doesn’t exist.
Set it BEFORE you hit Publish. Change a permalink after publication and the old address becomes a dead 404, along with every link anyone made to it.
Getting the Heading Levels Right
The format dropdown in the post editor gives you Title, Subtitle, Heading, Subheading, Minor heading and Normal.
Most guides will confidently tell you these map to H1, H2 and H3. Blogger doesn’t actually document the mapping, and it can shift depending on your theme. So don’t take anyone’s word for it, including mine. Publish a post, right-click the live page, choose View page source and search for <h2. Thirty seconds and you know for certain what your theme is doing.
What matters more than the tag numbers is the hierarchy, and that part is simple:
| Option | Use it for |
|---|---|
| Title | Nothing. Your post title already fills this role. |
| Subtitle | Nothing, for the same reason. |
| Heading | Your main section breaks. |
| Subheading | Sub-points inside a section. |
| Minor heading | Rarely. Only if a subheading needs breaking down further. |
Never skip a level to get a font size you like. If Heading looks too big, that’s a theme problem, not a structure problem.
Adding Alt Text to Images
Click any image in your post, then the gear icon, and fill in the Alt text field.
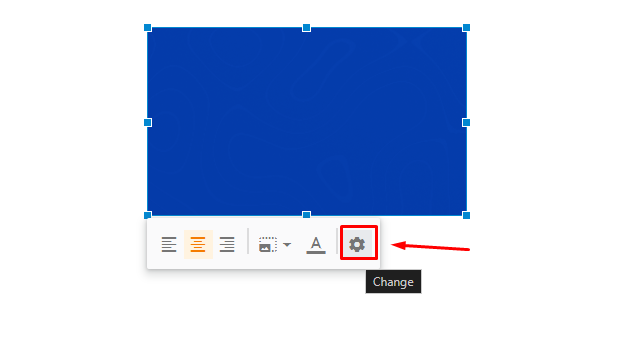
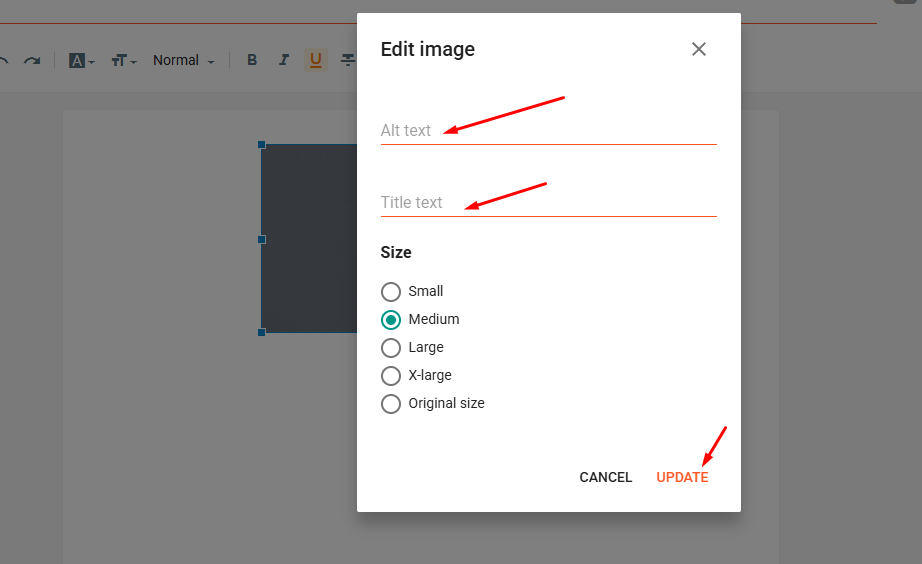
Describe what’s in the picture. “Blogger Settings page with the Crawlers and indexing section expanded” is useful to a screen reader and to Google Images. “blogger seo tips blogger tutorial cara setting seo” is useful to nobody.
The field next to it is Title text. That’s the little tooltip on hover. It does nothing for search. Skip it.
Blogger will resize your images for different screens, but it won’t shrink the original file. Run a 4 MB phone photo through TinyPNG or Squoosh before you upload it, or your post carries that weight forever.
Forcing HTTPS
Go to Settings » HTTPS. Set both HTTPS availability and HTTPS redirect to Yes.
On a .blogspot.com address this is already on and you can’t change it. On a custom domain you have to do it yourself, and plenty of people never notice they haven’t.
The redirect matters as much as the certificate. Without it, your blog answers on both http:// and https://, which means two versions of every page and Google having to guess which one counts.
If you get “HTTPS availability is being processed, check back later”, just wait and refresh. It clears on its own, usually within the hour.
Submitting Both Sitemaps, Not One
Go to Settings » Crawlers and indexing » Google Search Console. That link drops you into Search Console with the property half set up.
Once you’re verified, open Sitemaps and submit these two:
| Sitemap | What’s in it |
|---|---|
| sitemap.xml | Your blog posts |
| sitemap-pages.xml | Your static pages (About, Contact, Privacy Policy) |
Almost every tutorial mentions the first one and stops. Blogger keeps static pages in a completely separate file, so if you only submit sitemap.xml, your About and Contact pages are relying on Google stumbling across them through internal links.
You’ll also see older guides telling you to submit something like atom.xml?redirect=false&start-index=1&max-results=500. That’s a workaround from the years before Blogger generated a real sitemap. It isn’t needed and it isn’t a sitemap format. Ignore it.
Submitting a sitemap helps Google find your pages. It doesn’t promise it will index them, and it definitely doesn’t promise a ranking. If posts are getting discovered but not indexed, that’s a separate problem, and we covered it in getting new posts indexed faster.
Leaving the Custom robots.txt Alone
This is where most Blogger SEO tutorials stop being unhelpful and start being harmful.
Blogger already serves a robots.txt without you touching anything. Visit yourblog.com/robots.txt right now and you’ll see something close to this:
User-agent: *
Disallow: /search
Allow: /
Sitemap: https://yourblog.com/sitemap.xml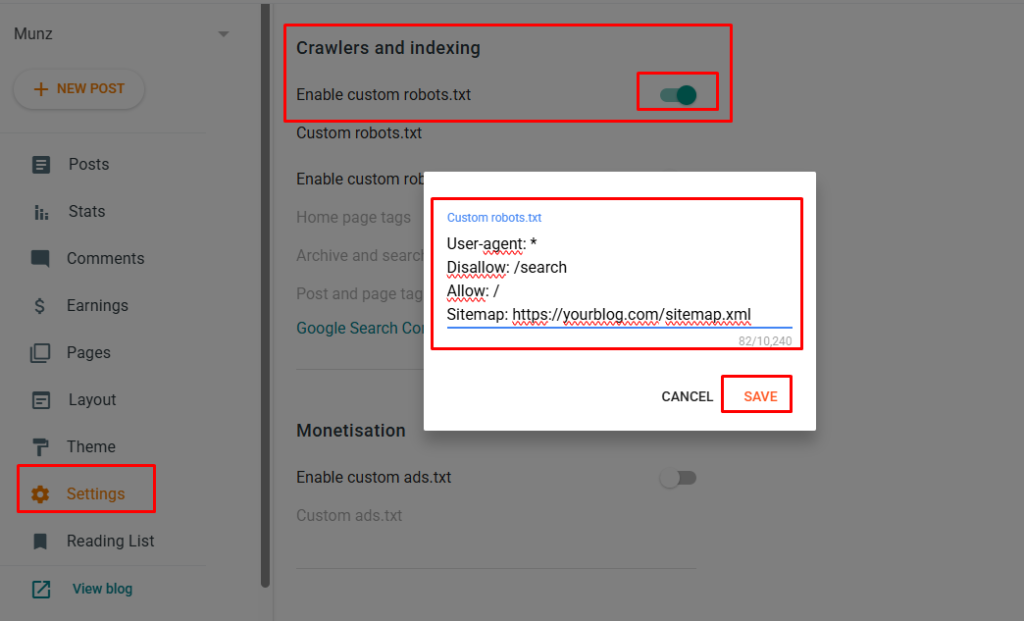
That’s already correct. It already keeps crawlers out of your label and search pages. It already points at your sitemap. There is nothing to fix.
What the tutorials tell you to do is switch on Enable custom robots.txt and paste in a “better” version from a free generator. You end up with the same file, plus whatever typo the generator introduced, plus the ability to lock Googlebot out of your entire blog with one stray character. I’ve seen people paste Disallow: / and wonder for three weeks why their traffic died.
LEAVE THIS SWITCH OFF unless you have a specific page you need blocked and you know exactly why.
The Contradiction Nobody Catches
Here’s the one worth understanding properly, because once you see it you’ll spot it in every Blogger guide you read from now on.
The standard advice is: block /search in robots.txt, AND set your archive and search pages to noindex in the robots header tags. Do both, they say, to be safe.
Those two instructions cancel each other out. Crawling and indexing are separate steps. robots.txt controls crawling. The noindex tag is delivered inside the page itself, so Googlebot has to fetch the page to read it. Block the page in robots.txt and Googlebot never fetches it, never sees the noindex, and the page can still end up in the index through links pointing at it. Google documents this directly: a noindex rule is only obeyed if the page is crawlable.
That’s the source of the “Indexed, though blocked by robots.txt” warning people get in Search Console and can’t explain.
You pick one. For a normal blog, the default robots.txt block on /search is enough, and you don’t need to reach for noindex on top of it. This is the same distinction we went through in robots.txt explained, and it’s worth having straight in your head before you touch either setting.
Setting the Robots Header Tags (and Skipping the Dead One)
If you do switch on Enable custom robots header tags in Crawlers and indexing, here’s the whole configuration:
| Section | Tick this | Leave everything else |
|---|---|---|
| Home page tags | all | Unticked |
| Archive and search page tags | noindex | Unticked |
| Post and page tags | all | Unticked |
Now the specific thing to NOT tick. You’ll see a checkbox called noodp, and a large number of guides tell you to combine it with “all”. Don’t.
noodp stood for “no Open Directory Project”. It told search engines not to pull your title and description from DMOZ, a human-edited web directory. DMOZ was shut down on 17 March 2017. Google confirmed a few months later that the directive had become a no-op, meaning it does precisely nothing. Blogger simply never removed the checkbox, so the advice keeps getting copied from one tutorial to the next, nine years after the thing it referred to stopped existing.
Ticking it won’t hurt your blog. It just marks whoever told you to do it as someone repeating a list they never checked.
One side effect worth knowing: switching this on adds a Custom robots tags box to every post’s sidebar. Leave it alone. Set it wrong on a post and you’ll noindex your own article without noticing.
Skipping the Meta Keywords Trick
Older Blogger guides send you into Theme » Edit HTML to paste a block of meta keywords into your template. Something like this:
<meta content='blogger seo, cara setting seo, blogspot' name='keywords'/>Google announced in 2009 that it doesn’t use the keywords meta tag for web ranking, and nothing has changed since. Bing has said publicly it can read a stuffed keywords tag as a spam signal.
So you’d be editing your theme’s raw HTML, which is the one part of Blogger where a mistake actually breaks your blog, in exchange for nothing. If you want to poke at Edit HTML, back up your theme first: Theme » the arrow next to Customize » Backup.
When Nothing Happens
You’ve done all of the above and your posts still aren’t showing up. This is the normal experience, not a sign you did it wrong, so here’s what to check and what to expect.
First, confirm the blog is even visible. Check Settings » Privacy. If “Visible to search engines” is off, nothing else you did matters.
Then check one URL properly. Paste a post URL into the URL Inspection tool in Search Console. It’ll tell you whether the page is indexed, whether it’s blocked, or whether Google crawled it and chose not to index it. Guessing from search results is a waste of an afternoon.
Then wait. Indexing on a new blog is genuinely slow. A few days is common. Several weeks is not unusual for a blog with no backlinks and no history. Requesting indexing in Search Console doesn’t jump the queue, whatever anyone tells you.
And here’s the honest close. Every setting above is table stakes. None of it makes you rank. It stops you from being invisible, which is a different thing, and it takes maybe twenty minutes total. If you finish this and expect traffic on Friday, you’ll be disappointed. What you’ve actually done is remove the technical excuses, so that from here the only thing standing between you and search traffic is whether your posts are worth reading. That part takes longer and there’s no settings page for it.